
We have been wanting a hard top on Questeria for a while. I look at videos of people making them and I think it will be too difficult for our situation. We were finally about to give up and replace our canvas soft top bimini when we found a used hard top for sale on Facebook. At first, we thought it wouldn’t fit right but once we got it home, it was like it was custom made.
A Little History
When we got Questeria in 2005, it had a canvas bimini top and dodger. They were worn out, but the frame was good. It was made of stainless steel pipes that attached to brackets that were through-bolted to the cockpit—it was over-engineered.
We lived with it until 2009. Instead of just a dodger, we wanted a full enclosure so we could stay dry in the cockpit. We also wanted to use the more expensive Strataglass so we could see through it.
We called a canvas guy in New Bern, NC. At first he wanted to replace the stainless steel frame with a standard aluminum frame. We wanted to use our existing frame, so he finally agreed to it.
We were pretty happy with it at first, but it wasn’t as waterproof as we wanted. Another issue with it was that we could not remove it without cutting the zippers for the dodger and side curtains.
We modified it so that it could be removed without cutting the zippers. We patched it where it had started to show wear and added a valance to make it more waterproof. We also added screens, using Textilene vinyl mesh, so we could get air and shade. See Questeria Journal 6. for details.
In 2015 we hired someone to make a new dodger out of Makrolon. Makrolon is a polycarbonate sheet that is as clear as glass. Then we were able to keep the dodger down while we were underway.
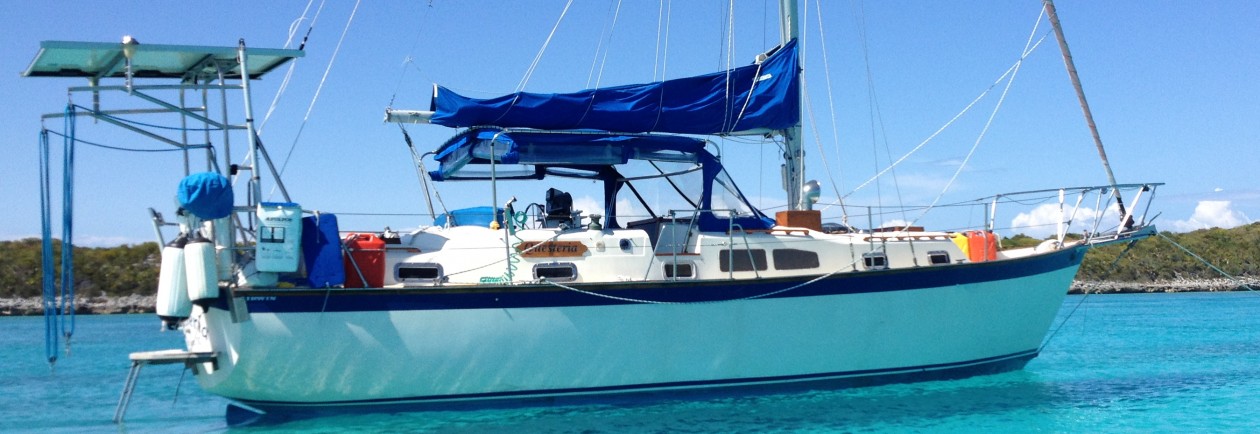
The header image at the beginning of this BLOG shows it this way when we were anchored in the Bahamas.
In 2018 hurricane Irma strikes the Florida Keys. The bimini, which was already in bad shape, is now completely ruined. At this point we are seriously considering a hard top, but in the meantime, we take it down and patch it. See my previous post After Irma for details.
Present Day
It’s 2022 and we haven’t done anything with the bimini since post-Irma repairs. We get someone to give us a price on another canvas bimini, and she is coming over to take some final measurements, when George calls.
George is Fran’s uncle and the previous owner of Questeria. He knew we wanted a hard top because we have been admiring his on Steel Lady. He was looking on Facebook and saw one that he thought would work for us. He came over to our boat and helped us measure the existing frame.
Once we saw that it would fit, he contacted the guy and we started talking.
The Purchase
This guy, who’s name is also Ron, bought it for his sailboat, but couldn’t get anyone to make a frame for it, so he decided to sell it on Facebook. He had it stored on a small boat trailer, like you would use for a dinghy. We asked him if we could borrow the trailer to get it home and he said “Sure, but the trailer’s for sale too”. George had been looking for a trailer like that, so he agreed to buy it for $200, and we got the hard top for $300.
We drove down to meet him and checkout the hard top. It was about a 50 minute drive. The hardtop is made of fiberglass. There are a few stains and stress cracks, but for the price, it’s in pretty good shape. It has a window in the middle, so you can look at the sails (or maybe it’s a moon roof). It has a rubber rub rail around the outside. At first glance it appeared to be black, but it was white at one time, and had mildewed. It also has an aluminum handrail that is in the right spot for getting on Questeria. There are eight holes in the top, presumably where it was originally mounted.
We paid him for the hard top and George paid him for the trailer. Ron signed over the title to George. We added a ratchet strap to hold down the hard top and hooked the trailer to George’s SUV—we were on our way back to Marathon.
Bringing it to the Boat
Once we got to the marina, George backed up the trailer as close to the dock as possible. We unstrapped it and picked it up to see how heavy it was. Ron told us he thought it weighed about 200 pounds—I think it weighs more.
There were not a lot of people around the marina due to an event in town. One guy saw us, and helped us carry it to the boat. Then a couple more people saw us and helped get it down the finger pier and up onto the boat. We put it on the existing frame—canvas bimini and all.

Installing the Hard Top
The next day, we are pretty much on our own.

The first step is to remove the old canvas bimini. Fran and I untie it from the frame and remove it. Now, without the old canvas, we can see how it looks sitting on the frame.

Our stainless steel frame is made up of four tubes that are thru-bolted to the sides of the cockpit. There are bent stainless pipes going into the front and rear tube on each side. There are a crosspieces on the front and rear, each slightly bowed upwards. There are also crosspieces in the middle connecting the front, rear, and each side. These are also bowed upwards. There is also curved pipe across the front, for extra bracing.
The next step is to remove the crosspieces, so the hardtop can sit better on the frame. To do that, we must lift the hardtop. We make a harness by stringing line through the eight mounting holes, and tie the harness to our spinnaker halyard. We also tie lines to the dinghy davits to keep it from going forward.

With our makeshift harness, halyard, and the help of two neighbors, we are able to lift the hardtop enough to remove all the crosspieces. We lower the hardtop down on the two side rails, strap it down, and call it a day.

At this point, we decide that we should put crosspieces in the front and rear. The ones we just removed are bowed, so we have two choices; straighten them or buy new ones. Fran drives around to see if anyone can straighten them. The only person she can find tells her that he would charge about the same amount as it would cost to buy new ones.
The next day, Brenda, David and George come to help. When David sees the crosspieces, he says he can straighten them by hand in the workshop. They turn out great!
We have to cut a few inches from the front crosspiece to make it fit better. We lift the hardtop with our halyard and replace the front and rear crosspieces. We lower it and pop-rivet everything together.


After we get the frame together, the next step is to bolt the hardtop to the frame with u-bolts. This will happen tomorrow.

Fran and I are on our own today, but we are almost done. I get some u-bolts and fairing compound from West Marine, while Fran cleans the rust stains from underneath the hardtop. I use six u-bolts, one in the front, one in the back, and two on each side. I fill in the holes with fairing compound. We also caulk around the window where it leaks.
Bruce comes by to look at it. We hire him to paint it the same color as the top side of boat, which had been painted a few years earlier. (See New Paint.) He suggests we remove the rub rail, so we do that, and clean it up. It looks great. You can see it at the top of this post.
We are leaving the next day, and Bruce will paint it while we are gone. When we get back, we will work on the dodger and side curtains. I’ll post about these later.